Headscaleサーバを動かす
Headscaleのサーバを動かしてみる。クライアント側はTailscaleのクライアントを使いながら、Tailscaleのサービスではなく、オープンソースの自前のサービスを使うことにより、完全にプロプライエタリなTailscaleから逃れることができる。なぜなら、Tailscaleのクライアントはすべてオープンソースだからだ。
ただし、Headscaleそのものは、かなり敷居が高い。まず、本家にはGUIクライアントがなく、コマンドラインで操作しないといけない。第三者がGUIクライアントを二つばかり作成しているが、それらは今後見ていくことにして、とりあえずは、サーバの起動とコマンドラインでの操作を行ってみる。
Docker-compose
適当なフォルダを作成し、docker-compose.ymlを作る。
例によって、Traefikをリバースプロキシとしている。むしろTraefik用の設定の方が多い。
version: '3.5'
services:
  headscale:
    container_name: headscale
    image: headscale/headscale:0.20.0
    volumes:
      - ./config:/etc/headscale/
      - ./data:/var/lib/headscale
    ports:
      # metrics test /metrics
      - 127.0.0.1:9091:9090
    command: headscale serve
    restart: unless-stopped
    labels:
      - "traefik.enable=true"
      - "traefik.http.routers.headscale.rule=Host(`hs.example.com`)"
      - "traefik.http.routers.headscale.entrypoints=websecure"
      - "traefik.http.routers.headscale.tls.certresolver=myresolver"
      - "traefik.http.services.headscale.loadbalancer.server.port=80"
networks:
  default:
    external:
      name: traefik-network
このフォルダで以下を行う。
mkdir -p ./config
touch ./config/db.sqlite
curl https://raw.githubusercontent.com/juanfont/headscale/main/config-example.yaml -o ./config/config.yaml
config.yamlを少々変更する。とりあえず必要なところだけ。
server_url: https://hs.example.com:443
listen_addr: 0.0.0.0:80
metrics_listen_addr: 0.0.0.0:9090
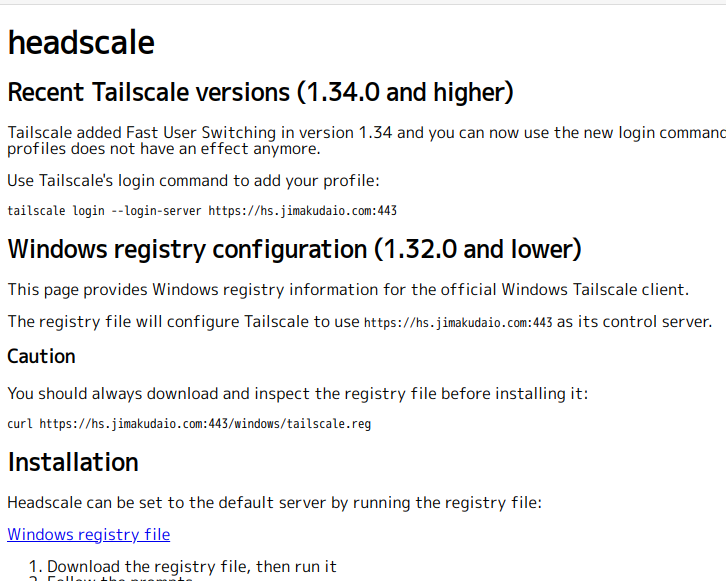
実行と状態の検証
docker-compose up -d
で実行する。なぜか、https://hs.example.comでは何も表示されない。https://hs.example.com/windowsを表示させると、以下のような表示がされる。
さらに、端末で「 curl http://localhost:9091/metrics」とすると、以下が確認できる。
# HELP go_gc_duration_seconds A summary of the pause duration of garbage collection cycles.
# TYPE go_gc_duration_seconds summary
go_gc_duration_seconds{quantile="0"} 8.9127e-05
go_gc_duration_seconds{quantile="0.25"} 0.000171308
go_gc_duration_seconds{quantile="0.5"} 0.000238185
go_gc_duration_seconds{quantile="0.75"} 0.000370451
go_gc_duration_seconds{quantile="1"} 0.001290994
go_gc_duration_seconds_sum 0.002160065
go_gc_duration_seconds_count 5
# HELP go_goroutines Number of goroutines that currently exist.
# TYPE go_goroutines gauge
go_goroutines 24
# HELP go_info Information about the Go environment.
....
ユーザを作成する
最初に示した通り、GUIの操作画面は無い。すべて端末で行う必要があるが、Dockerを使用しているので、少々面倒な点がある。
以下は、ユーザを作成して確認したところ。
「docker exec headscale」はDockerのコマンドで、headscaleコンテナを指定して実行するという意味。残りの「headscale users create ysugimura」でユーザを作成している。これ移行も同様。
# docker exec headscale headscale users create ysugimura
User created
# docker exec headscale headscale users list
ID | Name      | Created
1  | ysugimura | 2023-02-12 13:43:58
スマフォを登録してみる
Android用のTailscaleクライアントをインストールし、以下の操作をする。
Android用Tailscaleクライアントのコントロールサーバを変更する
もちろん、途中の操作はサーバ側で行わないといけない。例えば以下である。
# docker exec headscale headscale nodes register --user ysugimura --key nodekey:2f12c98097d98a06a7d7a******************ce6f66374e5a71f7c16
Linuxサーバを登録してみる
AlmaLinux8にインストールする。
Download Tailscaleにあるように、単に「curl -fsSL https://tailscale.com/install.sh | sh」とする。
次に以下を行う。
# tailscale up --login-server https://hs.example.com

To authenticate, visit:

        https://hs.jimakudaio.com:443/register/nodekey:d5860ef03896db********8868fadedccb354863d
上をブラウザで開くと、以下のような表示になる。
headscale
Machine registration
Run the command below in the headscale server to add this machine to your network:

headscale nodes register --user USERNAME --key nodekey:d5860ef03896dbd10589943bf34****************dccb354863d
これをサーバ側端末で実行する。
docker exec headscale headscale nodes register --user ysugimura --key nodekey:d5860ef03896dbd105899**********cb354863d
Machine v133-18-***** registered
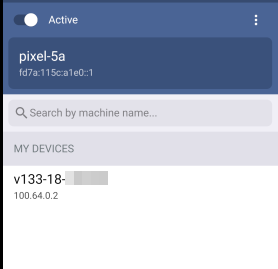
[root@kagoya5 ~]# docker exec headscale headscale nodes list
ID | Hostname | Name | MachineKey | NodeKey | User | IP addresses | Ephemeral | Last seen | Expiration | Online | Expired
1 | Pixel 5a | pixel-5a | [NslZ4] | [LxLJg] | ysugimura | 100.64.0.1, fd7a:115c:a1e0::1 | false | 2023-02-12 14:34:34 | 0001-01-01 00:00:00 | online | no
2 | v133-18-****** | v133-18-****** | [PMGmR] | [1YYO8] | ysugimura | 100.64.0.2, fd7a:115c:a1e0::2 | false | 2023-02-12 14:34:35 | 0001-01-01 00:00:00 | online | no
Alma Linux8からPixel 5aにpingしてみると、完全にうまく行く。
# ping 100.64.0.1
PING 100.64.0.1 (100.64.0.1) 56(84) bytes of data.
64 bytes from 100.64.0.1: icmp_seq=1 ttl=64 time=75.6 ms
64 bytes from 100.64.0.1: icmp_seq=2 ttl=64 time=64.7 ms
64 bytes from 100.64.0.1: icmp_seq=3 ttl=64 time=67.6 ms
64 bytes from 100.64.0.1: icmp_seq=4 ttl=64 time=70.10 ms
64 bytes from 100.64.0.1: icmp_seq=5 ttl=64 time=67.0 ms
一方、スマフォの方を見てみると、勝手に以下のように表示が変更されている。
まとめ
- 現在のところ完全にうまく行っているようだ。
- しかし、かなり登録がめんどくさい。
- Tailscale上で振られていたIPアドレスは無視され、100.64.0.1から連番で振られる模様。
- 現在のところDERPサーバについては考慮していない。つまり、直接的に接続できない場合に、リレーサーバを行うものなのだが、今回の実験でこれが使われているかは不明。
- これに対するGUIが二つばかりあるようなので試してみることにする。