RestyGWTを使う、その1
ここでは、RestyGWTを使うべくステップバイステップで見ていく。
前提としては以下だ。
- Eclipse-2019-06
- Eclipse用GWTプラグイン3.0
- Gradle 5.5
GWT: Changing from GWT-RPC to JSON with RestyGWTを参考にしている。
EclipseのGWTプラグインサンプルを作成する
Eclipse上でGWTプラグイン(現在はバージョン3.0)におけるサンプルプロジェクト作成機能を使い、プロジェクトを作成する。
その際、Eclipseのデフォルトの環境をJava9以上にしていると、このサンプル自体が動作しないので注意。少なくとも(このプロジェクトのみは)Java8の環境にしておく必要がある。
※GWT:Eclipseプラグインサンプルが最新Javaで動作しないを参照されたい。ただし、以下のbuild.gradleを動作させれば、facet以外の問題は解決するはず。
build.gradleを作成する
gradleで依存管理をさせ、Eclipseの.project, .classpathを生成させたいので、build.gradleを作る。
apply plugin: 'java'
apply plugin: 'eclipse'
sourceCompatibility = 1.8
targetCompatibility = 1.8

eclipse {
  project {
    natures 'org.eclipse.wst.common.project.facet.core.nature'
    buildCommand 'org.eclipse.wst.common.project.facet.core.builder'
    buildCommand 'com.gwtplugins.gdt.eclipse.core.webAppProjectValidator'
  }
  classpath {
    defaultOutputDir = file('war/WEB-INF/classes')
  }
}
sourceSets {
  main {
    java {
      srcDir 'src'
    }
  }
}
repositories {
  jcenter()
}
dependencies {
  compile group: 'com.google.gwt', name: 'gwt-dev', version: '2.8.2'
  compile group: 'com.google.gwt', name: 'gwt-user', version: '2.8.2'
}
※上記でも「Java compiler level does not match the version of the installed Java project facet.」というエラーは解消しない。自動で解消する方法もあるが、むやみに複雑になるので手で解消する。
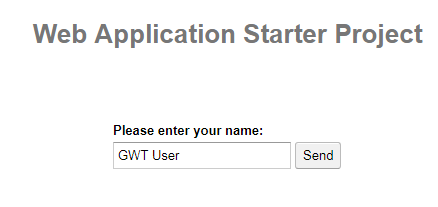
この時点でサンプルの動作を確認しておく。以下のような画面だ。
JAX-RS、Jersey、Jacksonを追加し、web.xmlの設定を変更
サーバ側でJAX-RSの処理をさせるために、以下の依存を追加する。この時点では、クライアント側の変更なく、RestyGWTの追加も無い。
dependencies {
  compile group: 'com.google.gwt', name: 'gwt-dev', version: '2.8.2'
  compile group: 'com.google.gwt', name: 'gwt-user', version: '2.8.2'

  // 追加
  compile group: 'javax.ws.rs', name: 'javax.ws.rs-api', version: '2.1.1'
  compile group: 'org.glassfish.jersey.containers', name: 'jersey-container-servlet', version: '2.29'
  compile group: 'org.glassfish.jersey.media', name: 'jersey-media-json-jackson', version: '2.29'
  compile group: 'com.fasterxml.jackson.jaxrs', name: 'jackson-jaxrs-json-provider', version: '2.9.9'
  compile group: 'org.glassfish.jersey.inject', name: 'jersey-hk2', version: '2.29'
}
web.xmlを以下に変更する。
※「jersey.config.server.provider.packages」の値が「sample.server」になっていることに注意。このGWTサンプルのパッケージをsampleとしたため、サーバ側のコードのパッケージはsample.serverになっている。
<?xml version="1.0" encoding="UTF-8"?>
<web-app xmlns:xsi="http://www.w3.org/2001/XMLSchema-instance"
         xsi:schemaLocation="http://java.sun.com/xml/ns/javaee
              http://java.sun.com/xml/ns/javaee/web-app_2_5.xsd"
         version="2.5"
         xmlns="http://java.sun.com/xml/ns/javaee">

  <!-- Servlets -->
  <servlet>
    <servlet-name>greetServlet</servlet-name>
    <servlet-class>sample.server.GreetingServiceImpl</servlet-class>
  </servlet>

  <servlet-mapping>
    <servlet-name>greetServlet</servlet-name>
    <url-pattern>/sample/greet</url-pattern>
  </servlet-mapping>

  <!-- 以下を追加 -->
  <servlet>
    <servlet-name>restServlet</servlet-name>
    <servlet-class>org.glassfish.jersey.servlet.ServletContainer</servlet-class>
    <init-param>
        <param-name>jersey.config.server.provider.packages</param-name>
        <param-value>sample.server</param-value>
    </init-param>
  </servlet>
  <servlet-mapping>
    <servlet-name>restServlet</servlet-name>
    <url-pattern>/api/*</url-pattern>
  </servlet-mapping>
  <!-- ここまで -->

  <!-- Default page to serve -->
  <welcome-file-list>
    <welcome-file>Sample.html</welcome-file>
  </welcome-file-list>

</web-app>
以上の変更を行っても、元のGWTサンプルは正常に動作するはずだ。
RESTリソースを作る
元のGWTサンプルの機能はそのままに、サーバ側にRESTリソースを作ってみる。
package sample.server;

import java.util.*;

import javax.ws.rs.*;

import sample.shared.*;

@Path("/thing")
public class ThingResource {

  static Set<Thing>thingSet = new HashSet<Thing>() {{
    add(new Thing("1", "one"));
    add(new Thing("2", "two"));
    add(new Thing("3", "three"));
  }};

  @GET
  @Produces("application/json")
  public Collection<Thing> get() {
     return thingSet;
  }

  @GET
  @Path("/{id}")
  @Produces("application/json")
  public Thing getById(@PathParam("id")String id) {
    return thingSet.stream().filter(t->t.id.equals(id)).findAny().orElse(null);
  }
}
以下はクライアントでも使用するため、sharedに入れる。
package sample.shared;

public class Thing {
  public String id;
  public String name;

  // GWTの都合上、このコンストラクタが必要。
  // GWTの仕様とは異なり、publicでないといけないらしい
  public Thing() {}

  public Thing(String id, String name) {
    this.id = id;
    this.name = name;
  }
}
ブラウザで確認する
FirefoxにはJSONビューアがあって便利なのだが、以下ではChromeで確認。

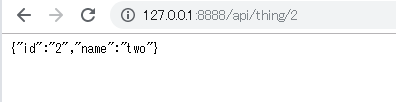
この時点で、RESTのサービスを作成しブラウザでその機能を確認できたものの、GWTクライアントからの呼び出しは行っていない。元のGWTサンプルと同一の機能であり、元のGWT-RPCを使用してサーバへのリクエストを行っている。
ServletContextやHttpServletRequestの取得方法
ちなみにだが、これらを取得したいときはこうする。
※ServletContextはフィールドレベルでよいが、HttpServletRequestは当然呼び出しごとに取得しなければならない。
package sample.server;

import java.util.*;

import javax.servlet.*;
import javax.servlet.http.*;
import javax.ws.rs.*;
import javax.ws.rs.core.*;

import sample.shared.*;

@Path("/thing")
public class ThingResource {

  @Context ServletContext context;

  static Set<Thing>thingSet = new HashSet<Thing>() {{
    add(new Thing("1", "one"));
    add(new Thing("2", "two"));
    add(new Thing("3", "three"));
  }};

  @GET
  @Produces("application/json")
  public Collection<Thing> get(@Context HttpServletRequest req) {
    System.out.println("contextPath:" + context.getContextPath());
    System.out.println("remote " + req.getRemoteAddr());

    return thingSet;
  }

  @GET
  @Path("/{id}")
  @Produces("application/json")
  public Thing getById(@PathParam("id")String id) {
    return thingSet.stream().filter(t->t.id.equals(id)).findAny().orElse(null);
  }
}